

前言:最近项目上需要设计一个自动分析工具,要求做出来后在每个使用者(同事)电脑上都能独立运行,且方便自动更新。为此特意研究了pyinstaller来实现多文件打包成exe并能自动更新。
一、pyinstaller安装和使用说明
在pycharm里搜索pyinstaller安装,或在terminal界面输入如下安装:
pip install pyinstaller安装完成后,可用pyinstaller将一个或多个py文件打包成exe,并可根据不同需求生成不同打包形式,同时在terminal界面输入如下指令查看各代码对应的形式。
pyinstaller -h现例举几个最常用的指令加以解释说明,
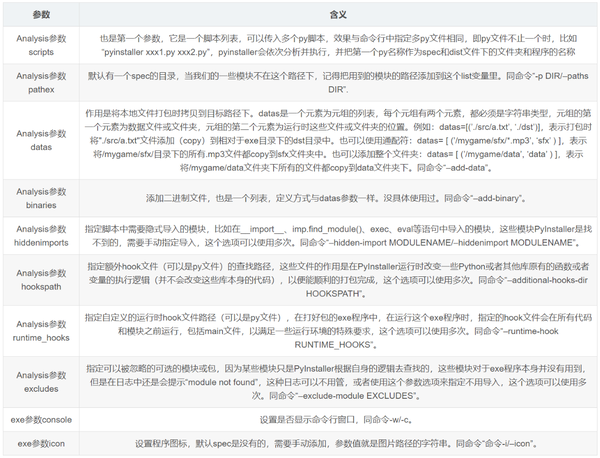
| code | meaning | explanation |
|---|---|---|
| -D | Create a one-folder bundle containing an executable (default). | 生成一个目录(包含多个文件)作为可执行文件 |
| -F | Create a one-file bundled executable. | 生成单个可执行文件 |
| –specpath DIR | Folder to store the generated spec file (default: current directory) | 指定目录存放spec文件 |
| -n | Name to assign to the bundled app and spec file (default: first script’s basename) | 指定项目名字 |
| -p DIR | A path to search for imports (like using PYTHONPATH). Multiple paths are allowed, separated by ‘;’, or use this option multiple times. | 设置 Python 导入模块的路径(和设置 PYTHONPATH 环境变量的作用相似)。也可使用路径分隔符(Windows 使用分号,Linux 使用冒号)来分隔多个路径 |
| -d | Provide assistance with debugging a frozen application. | debug版本的可执行文件 |
| -c | Open a console window for standard i/o (default). | 指定使用命令行窗口运行程序 |
| -w | do not provide a console window for standard i/o. | 指定程序运行时不显示命令行窗口 |
| -i <FILE.ico or FILE.exe,ID or FILE.icns or Image or “NONE”> | FILE.ico: apply the icon to a Windows executable. FILE.exe, ID:extract the icon with ID from an exe. FILE.icns: apply the icon to the .app bundle on Mac OS. | 添加图标 |
| -m <FILE or XML> | Add manifest FILE or XML to the exe. | 添加manifest文件或XML文件 |
| -r | Add or update a resource to a Windows executable. | 添加或更新资源到可执行文件 |
二、多文件打包成exe
关于多个文件打包成exe,各博客大佬汇总出的方法主要是2种:
1、pyinstaller [主文件] -p [其他文件1] -p [其他文件2]
2、使用spec方式
本文将依次试验这两种方法并探究各自的实用性和优缺点。为此本文举一个例子说明:设计一个程序用于计算某打工人扣除五险一金+个税后的实际到手收入。
程序结构如下:
- 主程序
# main.py
import os
from ensurance import calcu5_ensure
from income_tax import calcu_tax
if __name__ == '__main__':
base, extra = input("please input tax before income:").split()
base, extra = float(base), float(extra)
ensure5 = calcu5_ensure(base)
inc_tax = calcu_tax(base)
tax_after = base + extra - ensure5 - inc_tax
print(f"Final tax-after income is {tax_after}.")
temps = input("\n")- 计算五险一金
# ensurance.py
def calcu5_ensure(tax_before):
    five_per = [0.08, 0.02, 0, 0.003, 0, 0.12]
    five_per_count = [round(i * tax_before, 2) for i in five_per]
return sum(five_per_count)- 计算个税(随便取的百分比)
# income_tax.py
def calcu_tax(base):
    return base * 0.1
接下来就分别使用这两种方式进行打包。
2.1 pyinstaller [主文件] -p [其他文件1]
输入如下
pyinstaller main.py -p ensurance.py -p income_tax.py打包成功!
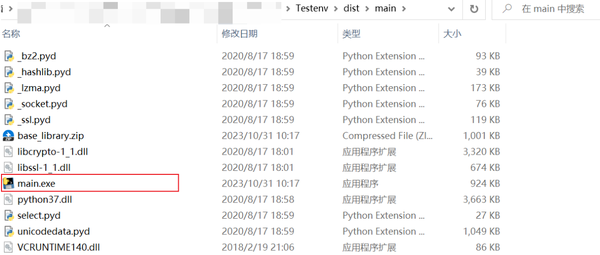
并在.\dist\main路径下可找到main.exe文件,
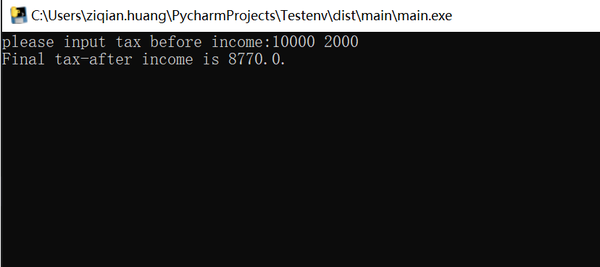
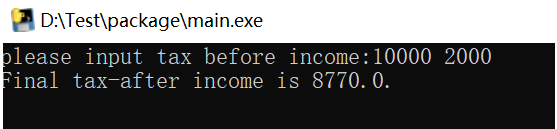
双击exe文件可正常运行,
但是,针对于文件较多的时候使用-p的方法就比较麻烦,这种时候可采用方案2。
2.2 pyinstaller xx.spec
① 只打包主程序mian.py以生成.spec文件并只保留这个文件,删除目录下生成的dist和build文件
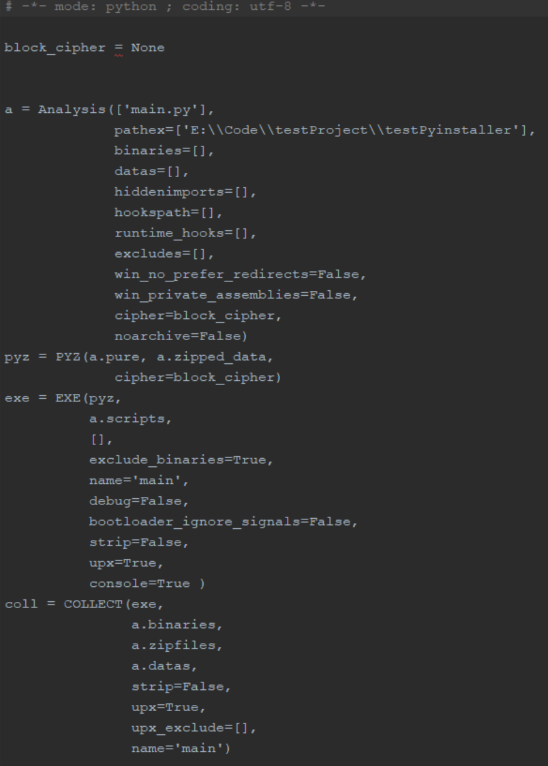
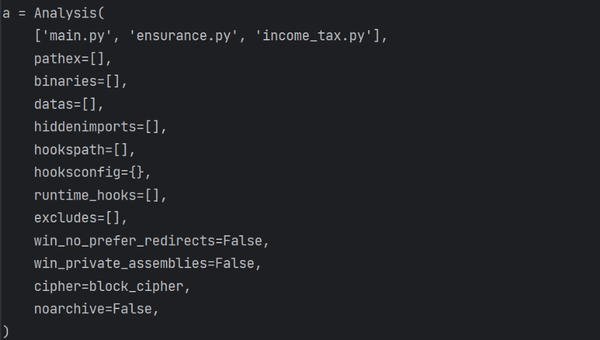
pyinstaller -F main.py② 更改.spec文件内容,补充想要一并打包的py文件或其他resource文件等。spec文件内容如下(步骤①若选了-F则不会有coll)
式中参数的含义如下,
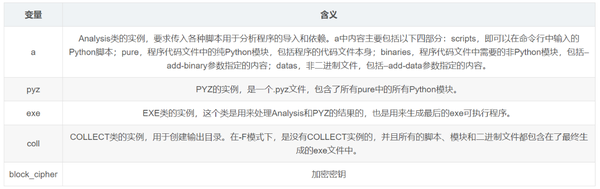
其中a和exe里的改动较多,pyz和coll基本没有要改的。且针对于a和exe中主要参数的含义如下,
回到刚才的例子,.spec文件需要修改第一行元素,
而后在terminal中输入,
pyinstaller main.spec此时在.\dist路径下就能找到打包好了的main.exe,经验证该方法生成的exe也可正常运行。

三、exe自动更新
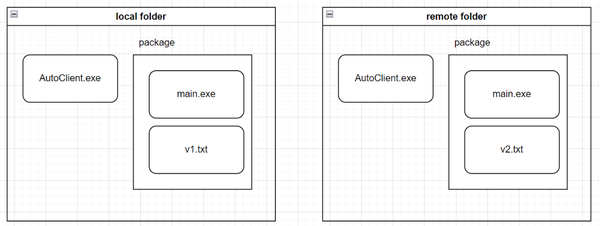
根据项目需求结合我司已有的远端服务器,假定主程序是main.exe,在每次更新的版本后我都会生成一个标明当前版本的xx.txt文件,升级工具是AutoClient.exe,他们的存放形式如下,
我的设计思路如下,
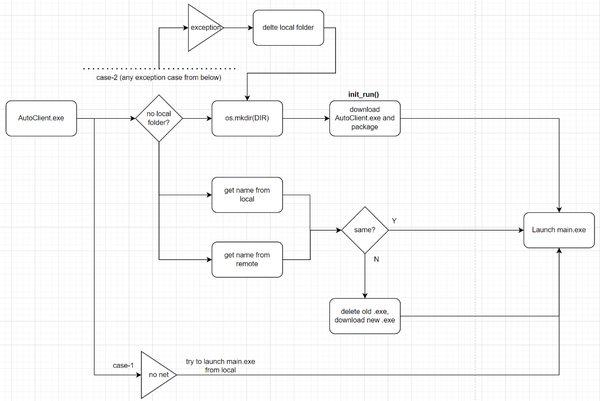
解读一下:
核心逻辑是运行AutoClient.exe这个升级工具,判断本地路径下的程序版本(读取xx.txt可识别)和远端路径下的版本是否一致,若不一致则需删除旧版本、下载新版本;若一致则无需更新。最后再调用最新版本的main.exe启动主程序。
所以第一步要先访问到服务器。
3.1 python连接到服务器
博客大佬有用NFS,FTP等服务器都可以实现,本文连接的是SFTP服务器。
安装paramiko库即可调用sftp,为方便调用我特意将sftp常用的几个功能封装在了MySFTP()类里,
class MySFTP():
def __init__(self):
self.sftp = None
self.ssh = paramiko.SSHClient()
self.ssh.set_missing_host_key_policy(paramiko.AutoAddPolicy())
# 重新设置下编码方式
self.ssh.encoding = 'gbk'
self.log_file = open("log.txt", "a")
self.file_list = []
def login(self, host_name, port, user_name, password):
"""
:param host_name:
:param port:
:param user_name:
:param password:
:return:
"""
try:
self.debug_print('开始尝试连接到 %s' % host_name)
self.ssh.connect(host_name, port, user_name, password)
self.debug_print('成功连接到 %s' % host_name)
self.debug_print('开始尝试登录到 %s' % host_name)
self.sftp = self.ssh.open_sftp()
self.debug_print('成功登录到 %s' % host_name)
except Exception as err:
self.deal_error("SFTP 连接或登录失败 ,错误描述为:%s" % err)
def upload(self, local_path, remote_path):
self.sftp.put(local_path, remote_path)
self.debug_print('文件上传成功')
def download(self, remote_path, local_path):
self.sftp.get(remote_path, local_path)
self.debug_print('文件下载成功')
def delete(self):
pass
def listdir(self, remote_path):
return self.sftp.listdir(remote_path)
def debug_print(self, s):
""" 打印日志
"""
self.write_log(s)
def write_log(self, log_str):
""" 记录日志
参数:
log_str:日志
"""
time_now = time.localtime()
date_now = time.strftime('%Y-%m-%d %H:%M:%S', time_now)
format_log_str = "%s ---> %s \n " % (date_now, log_str)
print(format_log_str)
self.log_file.write(format_log_str)
def deal_error(self, e):
""" 处理错误异常
参数:
e:异常
"""
log_str = '发生错误: %s' % e
self.write_log(log_str)
sys.exit()3.2 记录版本
将版本信息写入txt文件名上,将版本改动内容记录在txt文件里。
def write_version_txt():
"""
保留每一版的修改信息
:return:
"""
text_dic = {}
# v1版改动内容————————————————————————————————————————————————————————————————
cur_version = 'version_v1'
text_dic[cur_version] = "Establish the color analysis tool."
# v2版改动内容————————————————————————————————————————————————————————————————
# cur_version = 'version_v2'
# text_dic[cur_version] = "Change the color std."
# 汇总各个版本的改动,生成txt
cur_ver_txt = f"{cur_version}.txt"
# if os.path.exists(cur_ver_txt):
# os.remove(cur_ver_txt)
with open(cur_ver_txt, "w") as f:
json_str = json.dumps(text_dic, indent=0, ensure_ascii=False)
f.write(json_str)
f.write('\n')
print(f"{cur_ver_txt} is generated!")3.3 AutoClient.py实现自动更新逻辑
class UpdateFile():
def __init__(self, local_folder, remote_folder):
self.local_folder = local_folder
self.remote_folder = remote_folder
self.func = MySFTP()
host_name, port, user_name, password = 'xx, 22, 'yy', 'zz' # 此处需填写SFTP域名、端口、账号、密码
self.func.login(host_name, port, user_name, password)
def down_pkg(self):
local_pkg_folder = self.local_folder + '/package/'
remote_pkg_folder = self.remote_folder + '/package/'
os.mkdir(local_pkg_folder)
files = self.func.listdir(remote_pkg_folder)
for file in files:
self.func.download(remote_pkg_folder + file, local_pkg_folder + file)
def get_cur_version(self):
self.package_folder = self.local_folder + '/package'
# 【1】get current version
files = os.listdir(self.package_folder)
local_ver_file = [file for file in files if 'version' in file][0]
pattern = re.compile("version_(.*?).txt")
cur_version = pattern.findall(local_ver_file)[0]
print(f"Current version is {cur_version}")
return cur_version
def init_run(self):
self.func.download(remote_folder + '/AutoClient.exe', local_folder + '/AutoClient.exe')
self.down_pkg()
self.func.debug_print(f"下载成功!")
def update_run(self):
files = self.func.listdir(remote_folder + '/package')
remote_ver_file = [file for file in files if 'version' in file][0]
pattern = re.compile("version_(.*?).txt")
remote_version = pattern.findall(remote_ver_file)[0]
cur_version = self.get_cur_version()
if cur_version != remote_version:
shutil.rmtree(self.package_folder)
self.down_pkg()
self.func.debug_print(f"{remote_version}更新成功!")
if __name__ == '__main__':
# 【0】set local folder
local_folder = 'D:/Test'
remote_folder = '/xx/Test'
obf = UpdateFile(local_folder, remote_folder)
try: # 【1】 download or update
if not os.path.exists(local_folder): # first download
os.mkdir(local_folder)
obf.init_run()
else: # update
obf.update_run()
except Exception as e: # 【2】 deal exception
print(e)
shutil.rmtree(local_folder)
os.mkdir(local_folder)
obf.init_run()
os.startfile(local_folder + '/package/main.exe') # 【3】launch the main.exe这段代码实现的就是Fig 3.1中的自动更新逻辑。
3.4 打包生成AutoClient.exe
步骤同第二章。
①生成.spec,删除dist和build文件夹
pyinstaller -F AutoClient.py②修改.spec文件,[‘AutoClient.py’] → [‘AutoClient.py’, ‘sftp_connect.py’]
③打包成AutoClient.exe
pyinstaller AutoClient.spec3.5 测试验收
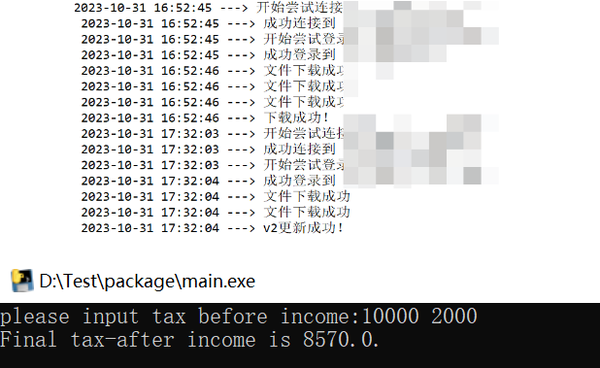
① 将AutoClient.exe和package(目录下是main.exe和version_v1.txt)上传到服务器上。
② 在本地随机路径下运行AutoClient.exe(保持联网),将会在本地D盘生成一个D:\Test的文件夹,里面包含了package子文件夹和AutoClient.exe
③(无需任何操作)等下载完成后,会弹出cmd命令窗界面,按提示输入税前base和加班费,代码会返回计算结果即税后收入。
④ 更新代码,生成新的exe。
# 据相关部门规定,加班费收入也要纳税所以将加班费也计入应纳税额
inc_tax = calcu_tax(base + extra)
⑤将新的exe和version_v2.txt上传到服务器上。
⑥运行AutoClient.exe(保持联网),看程序是否会自动更新。
⑦结果展示,不出所料成功更新到v2版本,而且运行后加班费也扣了200的税╮(╯▽╰)╭
扫码分享收藏